
When it comes to quilting, there’s something inherently special about creating a piece that’s both beautiful and functional. One such quilt that has gained popularity in recent years is the puff quilt. These quilts stand out because of their unique texture, which gives them a soft, plush feel, making them perfect for cozying up on cold evenings or adding a warm touch to your home décor. If you’re looking for a fun and rewarding project, learning how to create a puff quilt is a great way to combine creativity with comfort.
In this article, we’ll explore what a puff quilt is, the materials needed to make one, step-by-step instructions for creating your own, and some helpful tips for making the process smooth and enjoyable. By the end of this guide, you’ll be ready to craft a gorgeous puff quilt that you and your loved ones will cherish for years to come.
What is a Puff Quilt?
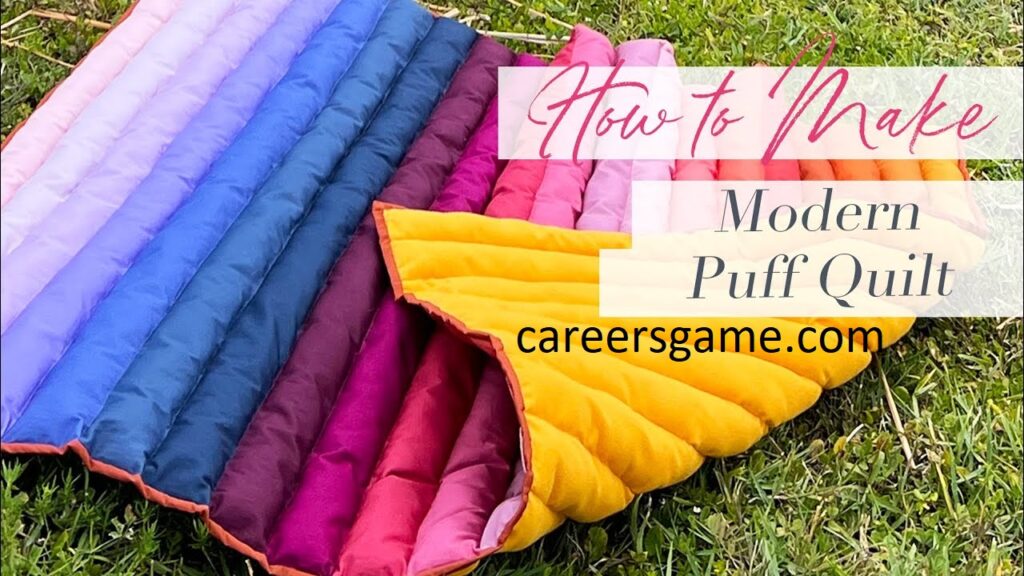
A puff quilt is a quilt that is characterized by its 3D, puffy texture. Unlike traditional quilts, which are flat, puff quilts use fabric squares that are stuffed with filling, creating a quilted effect that has more depth and softness. The puffy effect is achieved by sewing small fabric squares, filling them with a soft material such as batting or polyester stuffing, and then stitching them together in a way that makes them puff out.
This technique creates a tactile, cushioned surface that’s perfect for bedding, throws, or even wall hangings. The softness of the quilt makes it not only visually appealing but also incredibly cozy to snuggle up with. The raised texture provides an extra layer of warmth, making it a wonderful choice for colder months.
Materials Needed for a Puff Quilt
Before you begin creating your puff quilt, you’ll need to gather the necessary materials. Here’s a list of the basics:
- Fabric: Choose your fabric carefully, as it will determine the overall look of your quilt. Cotton is a popular choice for puff quilts because it’s soft and easy to work with, but you can also experiment with flannel, linen, or other materials. You’ll need enough fabric to cut into squares for the puffs and for the quilt’s backing and borders.
- Batting or Polyester Stuffing: This is the material used to fill the fabric squares and create the “puff” effect. You can use quilt batting, polyester stuffing, or even cotton batting, depending on the level of puffiness you desire.
- Thread: Use a strong, high-quality quilting thread that matches or contrasts with your fabric for sewing the quilt together.
- Sewing Machine: A sewing machine is recommended for efficiency, although it’s possible to sew the quilt by hand if you prefer.
- Rotary Cutter and Ruler: These tools will help you cut the fabric squares accurately.
- Pins: Pins will help you keep the fabric squares in place while you sew.
- Quilt Batting (for backing): You’ll need additional quilt batting or a fleece backing for the underside of the puff quilt to keep it soft and warm.
Step-by-Step Guide to Making a Puff Quilt
Now that you’ve gathered your materials, it’s time to start creating your puff quilt. Follow these steps to make your own cozy masterpiece.
Step 1: Cut the Fabric Squares
Begin by cutting your fabric into squares. The size of the squares can vary depending on your design preferences, but 4-inch or 5-inch squares are a common size for puff quilts. You’ll need at least twice as many fabric squares as the finished quilt size, as each square will be stuffed and sewn together to form the puffs.
Cut out the same number of squares from your batting or polyester stuffing. These will be used to fill the fabric squares, creating the puff effect.
Step 2: Create the Puffs
Next, you’ll create the puffs by sewing the fabric squares around the batting or stuffing. Take one fabric square and place the batting on top. Pin the batting to the fabric square, leaving a small margin around the edges. Using your sewing machine, stitch around the edge of the fabric square, but leave a small opening on one side.
Once the fabric square is stitched, turn it inside out, making sure the seam is on the inside and the fabric is smooth on the outside. Now, stuff the batting into the square, making sure to evenly distribute it. You want the puff to be nice and full but not overstuffed. Once the square is filled, hand-stitch the opening closed.
Repeat this process for each fabric square until you have a collection of stuffed puffs ready to assemble into your quilt.
Step 3: Arrange the Puffs
After you’ve created all your puffs, lay them out in the desired arrangement. You can arrange them in a simple grid pattern, or you can get creative with diagonal lines, checkerboard designs, or even circular arrangements. Play around with the layout until you find one that’s visually appealing to you.
Step 4: Sew the Puffs Together
Once you’re happy with the arrangement, it’s time to sew the puffs together. Place the puffs side by side and pin them in place, making sure the seams of each puff align evenly. Using your sewing machine, stitch the puffs together. Be sure to leave a small seam allowance between each puff so they’re connected but still maintain their individual shape.
To create a more finished look, you can sew a border around the edge of the quilt. This helps keep the puffs in place and adds a clean, polished finish.
Step 5: Add the Backing
Now that the top of your quilt is complete, it’s time to add the backing. You can use a coordinating fabric or even fleece for the back of your quilt. Cut the backing fabric to the same size as the quilt top, and then sew the backing to the quilt. Be sure to stitch around the edges to ensure everything is securely attached.
If you want to add extra warmth and softness, you can insert another layer of batting between the front and back of the quilt. This adds more puffiness and makes the quilt feel even more luxurious.
Step 6: Quilting and Finishing Touches
Finally, you can quilt the layers together by sewing through the center of each puff or adding additional quilting lines to secure the quilt. This step helps keep the layers of fabric and batting in place. Once your quilt is quilted, trim any excess fabric or batting, and add any final decorative touches, such as binding along the edges.
Conclusion
Creating a puff quilt is a fun, rewarding project that results in a cozy, comforting addition to any home. The unique texture of the puffy squares gives the quilt a tactile, warm feel, making it perfect for chilly nights or as a decorative piece in your living room or bedroom. Whether you’re an experienced quilter or a beginner, the process of making a puff quilt is both simple and enjoyable, allowing you to experiment with different fabrics, colors, and patterns.
By following these steps and taking your time, you’ll create a quilt that’s as functional as it is beautiful, providing warmth and comfort for years to come. So gather your materials, get creative, and embrace the art of creating a puff quilt—it’s a project that promises cozy comfort and lasting satisfaction.